
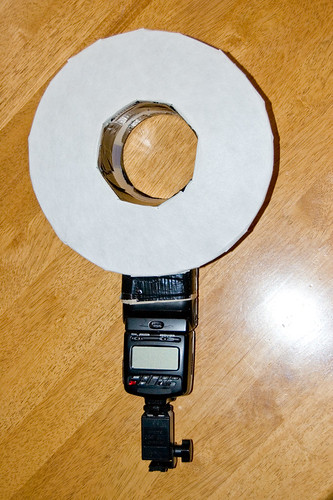
The DIY Ringflash (as opposed to the $910 Bowens Ringflash) is really creating a stir on the internet nowadays. I’m officially on the band wagon now. I invested about $5.00 on a trip to Wal-Mart the other night for a disposable casserole pan, 1 yard of white fabric and a plastic measuring cup. After about an hour or so of tinkering around while my wife watched Flip That House, I had a pretty effective little ringflash. It was inspired by Tanya Shields’ cheap DIY ringflash that I read about on Strobist last week.
If you’ll click on the photos, you can see my notes that I placed on them via Flickr.
I can’t say that there’s really anything unique about my setup; however, here’s the details:
- (1) quart-sized utility cup
- (1) casserole disposable aluminum pan
- (1) small sheet of white fabric
- (1) roll of black tape
- (1) scrap of cardboard from an envelope from MyPhotopipe.com
Steps
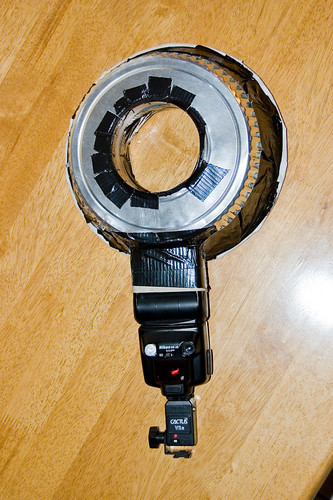
- trace the bottom of the cup onto the pan
- cut a hole in the middle of the pan along your outline
- fit the cup in the hole an mark where to cut the bottom out
- cut the bottom of the cup out at your mark
- trace the end of your speedlight along the side of the pan
- cut along your traced outline
- wrap a piece of cardboard around the end of your speed light and secure it with tape (make sure you can get your flash in and out)
- insert your flash with cardboard into the cutout on the side of the pan
- secure the cardboard in the pan with tape
- spray paint the exterior of the cup with flat white paint (this helps bounce the light around)
- secure the cup (now a tube) into the pan with tape
- mark the fabric on the lip of the cup
- cut a hole in the fabric just smaller than the size of the cup’s opening
- secure the fabric on the inside of the cup’s opening with tape
- trim the fabric along the exterior of the pan (I also cut into the overlapped portions to keep it from bunching up when I tried to lay it down)
- lay fabric down along the edges and secure with tape
- insert your gear and go take some test shots

If you’re into this kind of stuff, consider these other DIY rightlight resources:


[…] If you’re handy, for substantially less money you can create your own ringflash and start playing around it with it thanks to the folks at Photography Bay. […]