In this article, contributing author and stock photographer, Rich Legg, provides a lesson on pre-visualization in photography. You can learn more about Rich and how to connect with him at the end of this article.
One of the skills I have worked to develop that has helped my photography is to take a page from the book The Seven Habits of Highly Effective People and “begin with the end in mind”. How I relate this to photography is that I strive to always take time before I shoot a subject to create a mental picture of what I plan to photograph and how I will capture it. Famed photographer Ansel Adams called this technique pre-visualization. By taking the time to pre-think the shot, I find that I am able to create a better end result.
I make my living creating stock images that I sell through iStockphoto. When I am planning a stock photo shoot, the first thing I do is take time to envision what I want the final images to look like. I will generally come up with a few “signature” shots that I want to capture in the photo shoot. Once I have the images visualized in my mind, I then make some quick notes detailing what I want. These notes then serve as a sort-of blueprint which I use when determining what models, locations and props I will need to complete the photoshoot.
Here is an example of this pre-thinking and planning of a photograph. This sample is one of my early stock images that began as an idea sketched out on a piece of paper late one night.

I had the idea of creating a simulated crime scene. I was able to picture in my mind a body laying in a doorway with light streaming in through the opening behind the body and crime scene tape across the scene. My original sketch (which I now wish I would have saved) showed a very similar scene to what was represented in the final image.
As you’re reading this you might be thinking “Yeah, that’s fine for a stock photographer – but not for me because I shoot nature, kids, macro, etc…”. Pre-thinking and planning ahead can benefit nearly every photographer. I have found that even when shooting images just for fun rather than profit, taking a few moments (even as short as just a couple seconds) to pre-think the shot will yield better results.
Last week when the weather in Northern Utah moved to the mild side, my daughters and I took our dogs to the dog park. Knowing that a visit to the dog park usually involves a fair amount of time sitting around watching the dogs have fun, I brought along a camera to see what I could capture. While watching the dogs running all over the enclosed park, I decided I would shoot an image of my dog Holly as she jogged by.
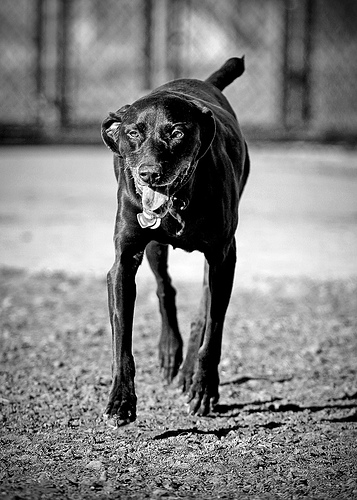
In just a few short moments before shooting her I created a quick list in my mind of what I wanted the shot to include – shallow depth-of-field, low angle, head on view. Armed with this mental picture I was able to quickly put myself in position to take the photograph. While the final result isn’t exactly what I pictured ahead of time, it is pretty darn close.
If pre-visualizing a photo before shooting it is not something that comes naturally to you, I would recommend making up a short list that can be easily referenced. By forcing yourself to take the time to think about (or look at if need be) a short list, you will begin to develop the habit of pre-planning your images. Here are some suggested items for putting on the list:
- Where is the focus point going to be?
- Narrow or wide depth of field?
- Vertical, horizontal or tilted composition?
- Where is the light source coming from?
- Would it be better shot from a high or low angle?
Like every rule of photography, there are instances where breaking it can lead to a great photograph. Probably every photographer can tell a story of a great shot they’ve captured as a spur-of-the-moment grab shot. But by taking time to plan ahead for the majority of your photos, you may find that you will begin to subconsciously apply these traits in your quick unplanned shots resulting in better images.
Like nearly every photographer I know, I am always looking for ways to improve my work. If you’ve got some pre-shot techniques similar to what I have described that you use and would like to contribute, please take a moment and share them in a comment.
Rich Legg is a stock photographer for iStockphoto. You can follow him on his blog, LeggNet’s Digital Capture, at leggnet.com or on Twitter at twitter.com/leggnet. His stock portfolio can be seen at RichLegg.com.


While I would never argue against planning a shot, this example is too much of a “just so” story to offer much didactic impact: Shooting dog play pretty much dictates every element that the author attributes to planning.
Dogs move so fast that you’re going to need a high shutter speed, which implies a relatively wide aperture and high ISO, which implies short DOF, etc. There are no other choices unless the photographer is doing some kind of stylized shooting with blurred images. Since dogs tend to play on open ground, like school yards or park land, there is little choice except a low angle perspective. As for head-on, well, that’s one of two options: The other is side shots. When I shot dogs playing, I’ll take anything I can get, head-on or side shots — they’re equally illustrative of how dogs play.